Multibranch pipeline
When we are looking for a well-automated branch-based Jenkins Continuous Integration & Delivery/Deployment (CI/CD) pipeline, the Jenkins multibranch pipeline is a way to go. As Jenkins’s multi-branch pipeline is fully a git-based pipeline as code, you can build your CI/CD workflows. pipeline as Code (PaaC) makes it easy to bring the advantages of automation and cloud portability. You can use the multi-branch pipeline model to quickly and reliably build, test, deploy, monitor, report on, and manage your test cases, and much more.
Let’s get started with the key concepts involved in a Jenkins multi-branch pipeline setup.
Multibranch Jenkins pipeline:
A multi-branch job is simply a folder of pipeline jobs. For every branch you have, Jenkins will create a folder. So instead of creating a pipeline job for each of the branches you have in a git repository, you could use a multibranch job. This means that you’ll have to create only one job. You also need to define where the Jenkinsfile is, and it’s important that this file is at the same location in all the branches you create.
What is the Jenkins pipeline and why do we need a multibranch pipeline:
Jenkins pipeline is a job configuration system that allows you to configure a pipeline of jobs that will be executed automatically on your behalf. A Jenkins pipeline can have multiple stages and each stage will be executed by a single agent, all running on a single machine or multiple machines. A pipeline is normally created for a specific branch of source code. When you create a new job, you will see an option for selecting the source code repository and branch. You can also create a fresh pipeline for a new project or a new feature of an existing project.
Jenkins pipeline allows you to have a flexible Jenkinsfile with stages for your build. So, you can have an initial stage where you run linting, tests, etc., and then separate stages for building artifacts or deploying them. This is very useful when you want to do multiple things in your pipeline.
But what if you only have one thing to do? Or if all the things you want to do are different depending on some configuration? Does it make sense to use the Jenkins pipeline here?
Multibranch pipeline is an alternative approach that might be more suitable in these cases. A Multibranch pipeline allows you to split tasks out into branches and merge them together later. This is very similar to the way Git branching works.
A multi-branch pipeline is a pipeline that has multiple branches. And for the multibranch pipeline to work, you need to have the Jenkinsfile in the SCM repo. The main advantage of using a multibranch pipeline is to build and deploy multiple branches from a single repository. Having a multibranch pipeline also allows you to have different environments for different branches. However, it is not recommended to use a multibranch pipeline if you do not have a standard branching and CI/CD strategy.

How Does a Multi-Branch Pipeline work?
The above image shows what a multi-branch pipeline workflow would look like, here is how the multi-branch pipeline works.
- When a developer creates a PR from a feature-2 branch to feature-1 a branch, GitHub sends a webhook with the PR information to Jenkins.
- Jenkins receives the PR and finds the relevant multibranch pipeline and creates a feature branch pipeline automatically. It then runs the jobs with the steps mentioned in the Jenkinsfile from the feature branch. During checkout, the source and target branches in the PR get merged. The PR merge will be blocked on GitHub until a build status from Jenkins is returned.
- Once the build finishes, Jenkins will update the status to GitHub PR. Now you will be able to merge the code. If you want to check the Jenkins build logs, you can find the Jenkins build log link in the PR status.
How to Create a Multibranch Pipeline in Jenkins
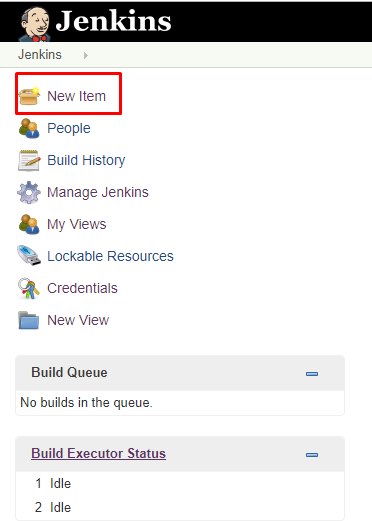
- Click New Item in the top left corner on the Jenkins dashboard.
2. Enter the name of your project in the Enter an item name field, scroll down, and select Multibranch Pipeline and click the OK button.

3. Enter Description (optional).
4. Add a Branch Source (for example, GitHub) and enter the location of the repository.
5. Select the Add button to add credentials and click Jenkins.
6. Enter the GitHub username, Password, ID, and Description
7. Select the dropdown to add credentials in the credentials field.

8. Under “Behaviours” select the required option that matches your requirement. You can either choose to discover all the branches in the repo or only branches with a Pull Request.
The pipeline can discover branches with a PR from a forked repo as well. Choosing these options depends on your required workflow.

9. If you choose to have a different name for Jenkinsfile, you can specify it in the build configuration. In the “Script Path” option, you can provide the required name. Ensure the Jenkinsfile is present in the repo with the same name you provide in the pipeline configuration.
10. Also, enable “Discard old builds” to keep only required build logs as shown below.

11. Click Save the Multibranch Pipeline project.
Jenkins automatically scans the designated repository and does some indexing for organization folders. Organization Folders enable Jenkins to monitor an entire GitHub Organization or Bitbucket Team/Project and automatically create new Multibranch Pipelines for repositories that contain branches and pull requests containing a Jenkinsfile.

Currently, this functionality exists only for GitHub and Bitbucket, with functionality provided by the GitHub Organization Folder and Bitbucket Branch Source plugins. Once jobs are created, build triggers automatically.

Configure Webhooks
12. We have to configure our Jenkins machine to communicate with our GitHub repository. For that, we need to get the Hook URL of the Jenkins machine.
13. Go to Manage Jenkins and select the Configure System view.
14. Find the GitHub Plugin Configuration section and click on the Advanced button.
15. Select the Specify another hook URL for GitHub configuration

16. Copy URL in the text box field and unselect it.
17. Click Save it will redirect to the Jenkins dashboard.
18. Navigate to the GitHub tab on the browser and select your GitHub repository.
19. Click on Settings. It will navigate to the repository settings.

Click on the Webhooks section.
21. Click on Add Webhook button. Paste the Hook URL on the Payload URL field.
22. Make sure the trigger webhook field has Just the push event option selected.
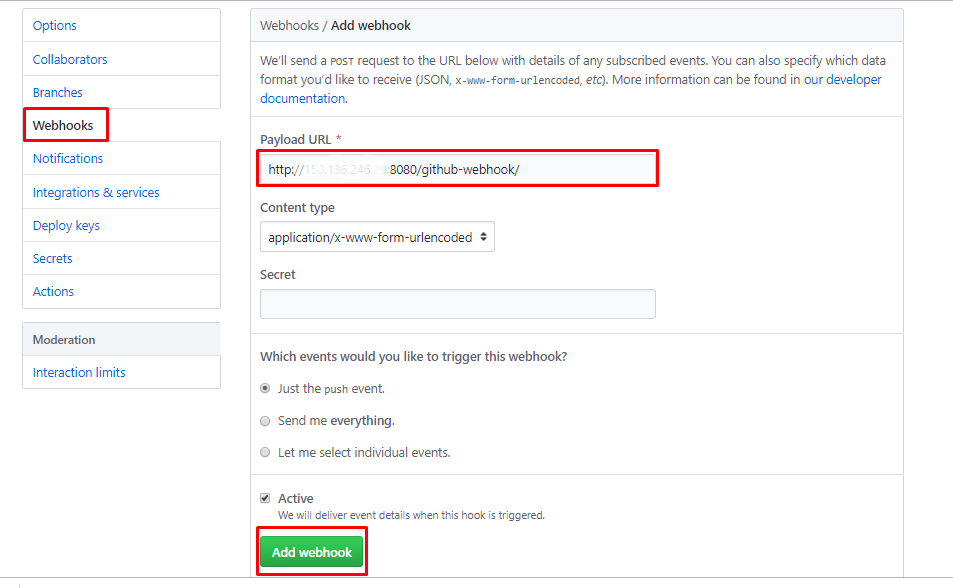
Click Add webhook and it will add the webhook to your repository.
24. Once you’ve added a webhook correctly, you can see the webhook with a green tick.

Go back to the repository and change to the Branch and Update any of the files. In this scenario.
26. Now see that the Jenkins job will trigger automatically.

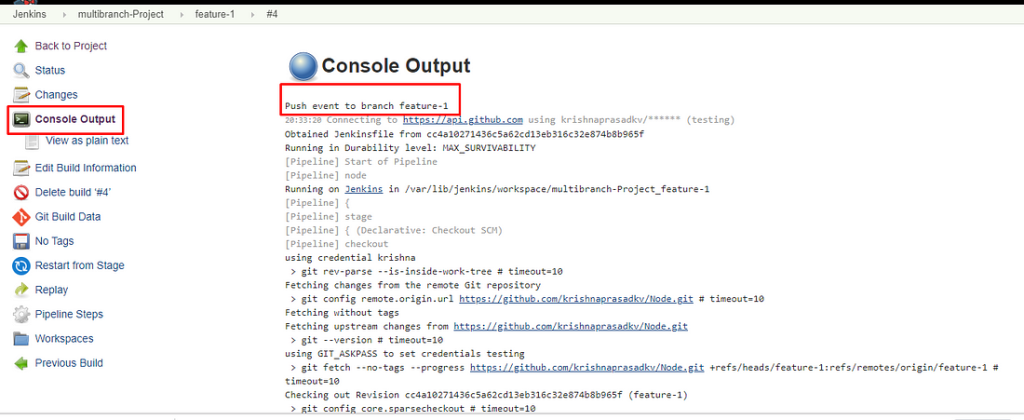
27. After pipeline execution is completed, we can verify the history of executed build under the Build History by clicking the build number.
28. Click on build number and select Console Output. Here you can see the outputs in each step.